
The art of Orecchiette pasta making is a cherished tradition in Italian cuisine.
At the heart of this tradition lies orecchiette, a pasta shape hailing from the Puglia region.
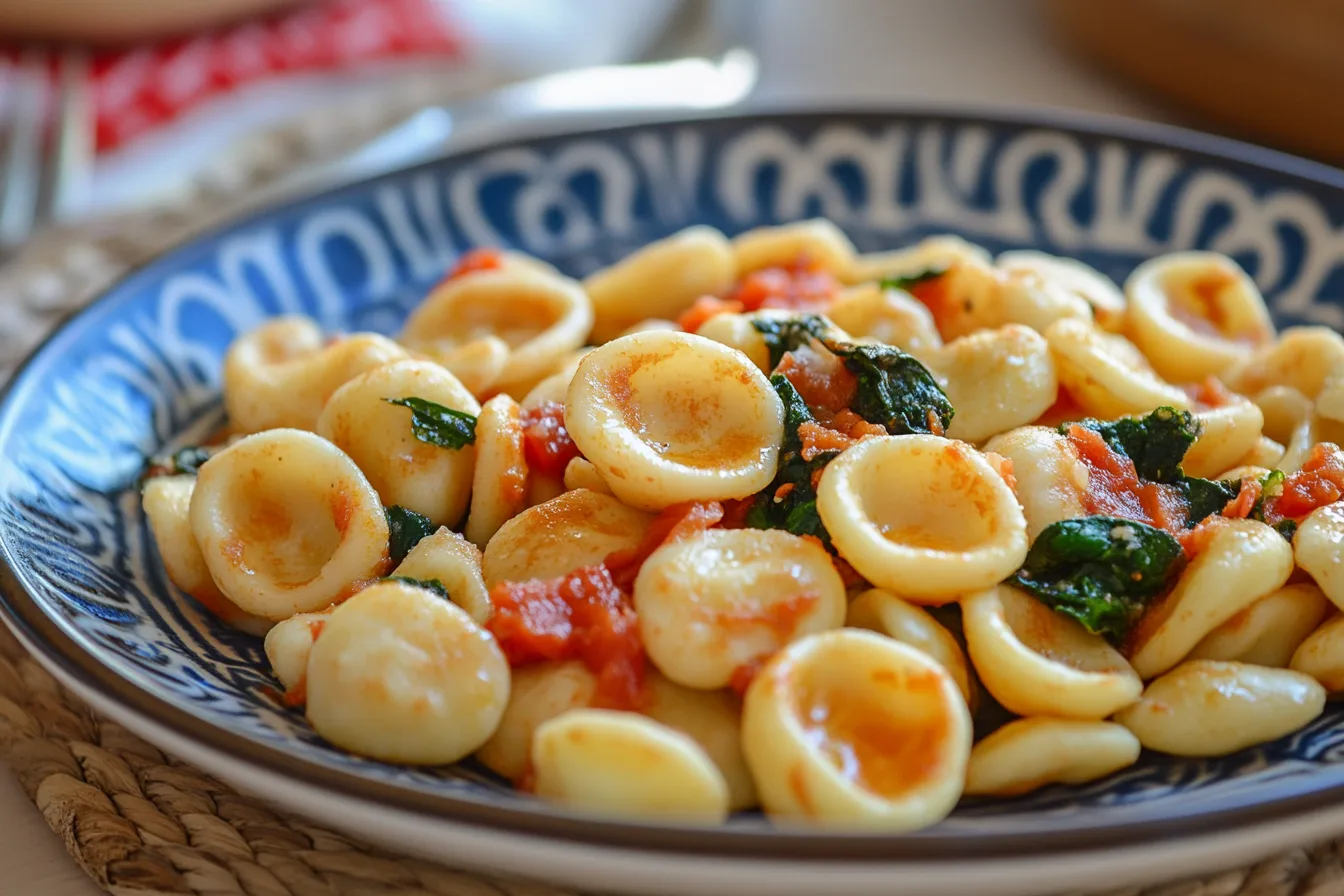
The name ‘orecchiette’ translates to ‘little ears’, a nod to its unique shape. This pasta is known for its ability to scoop up sauces and ingredients, enhancing every bite.
In this guide, we’ll delve into the process of making authentic orecchiette at home. We’ll explore traditional methods, share tips for perfecting your technique, and even offer a gluten-free variation.
Whether you’re a seasoned home cook or a beginner eager to try your hand at pasta making, this guide is for you.
We’ll also introduce you to orecchiette alla barese, a classic dish that pairs this pasta with robust flavors of broccoli rabe and sausage.
By the end of this article, you’ll be well-equipped to bring a piece of Italian culinary tradition into your own kitchen.
So, let’s embark on this journey of pasta making together.
The Origins of Orecchiette
Orecchiette is a pasta shape deeply rooted in the culinary history of Italy.
Its origins trace back to the Puglia region, located in the heel of Italy’s boot. This region is known for its rich agricultural heritage, producing a bounty of wheat, olives, and grapes.

The creation of orecchiette is a testament to the ingenuity of Puglia’s inhabitants. They crafted a pasta shape that not only utilized their abundant wheat but also perfectly captured the flavors of their local cuisine.
The process of making it is steeped in tradition. It involves:
- Mixing semolina flour and water to form a dough
- Kneading the dough until it’s smooth and elastic
- Shaping the pasta by hand, using a knife and a wooden board
- Cooking the pasta in salted boiling water
This pasta’s unique shape, reminiscent of a small ear, is designed to hold onto hearty sauces and ingredients. This feature makes orecchiette a versatile pasta, capable of transforming simple ingredients into a satisfying meal.
The tradition of making orecchiette has been passed down through generations. Today, it remains a beloved staple in Italian cuisine, celebrated for its rustic charm and delightful texture.
Essential Ingredients for Authentic Orecchiette
The beauty of orecchiette lies in its simplicity.
The authentic orecchiette recipe calls for just two ingredients: semolina flour and water.
Semolina flour, made from durum wheat, is the backbone of this pasta. It gives orecchiette its characteristic yellow hue and firm texture. The quality of your semolina flour can significantly impact the final result, so it’s worth investing in a high-quality product.
Water, the second ingredient, plays a crucial role in binding the semolina flour into a workable dough. The amount of water needed can vary depending on the humidity and the specific brand of semolina flour used.
Here’s a basic ratio to start with:
- 2 cups of semolina flour
- 1 cup of water
Remember, making pasta is an art. It may take a few tries to get the perfect dough consistency. Don’t be discouraged if your first batch isn’t perfect. With practice, you’ll learn to adjust the flour and water ratio to achieve the ideal texture.
In the end, the reward of biting into a piece of homemade orecchiette is well worth the effort.
Step-by-Step Guide to Making Orecchiette Dough
Making it dough is a simple process, but it requires patience and a bit of elbow grease.
Here’s a step-by-step guide to help you through the process:
- Start by pouring your semolina flour onto a clean, flat surface. Create a well in the center.
- Gradually add water into the well. Use a fork to slowly incorporate the flour from the sides into the water.
- Once the dough starts to come together, use your hands to knead. This is a crucial step in developing the gluten, which gives the pasta its structure.
- Knead the dough for about 10 minutes, or until it becomes smooth and elastic. If the dough is too dry, add a bit more water. If it’s too sticky, sprinkle on some more semolina flour.
- Once you’re satisfied with the texture of your dough, wrap it in plastic wrap or a damp cloth. Let it rest for at least 30 minutes. This resting period allows the gluten to relax, making the dough easier to shape.
Remember, the key to a great pasta dough is balance. The dough should be firm but not too hard, and moist but not sticky. It might take a few tries to get it right, but don’t be discouraged.
With practice, you’ll be able to feel when the dough is just right. And once you’ve mastered the dough, you’re well on your way to making authentic orecchiette at home.
Shaping Your Orecchiette: Techniques and Tips
Shaping orecchiette by hand is a skill that takes some practice, but it’s worth the effort.
The unique shape of it, which means “little ears” in Italian, is perfect for holding onto hearty sauces. Here are some techniques and tips to help you shape your orecchiette:
- After your dough has rested, divide it into smaller pieces. Roll each piece into a long, thin rope, about 1/2 inch in diameter.
- Cut the rope into small pieces, each about 1/2 inch long. These will be your individual orecchiette.
- To shape the orecchiette, take a piece of dough and press it with your thumb, dragging it slightly. This should create a concave shape, like a small ear.
- Flip the pasta over your thumb to give it its characteristic shape. The outside should be smooth, and the inside should have ridges from your thumb.
- Place the shaped pasta on a floured surface to prevent sticking. Repeat the process with the rest of the dough.

Don’t worry if your orecchiette aren’t perfect at first. The beauty of homemade pasta is in its rustic, handmade quality.
And remember, practice makes perfect. The more you make orecchiette, the better you’ll get at shaping them.
So, roll up your sleeves and get ready to impress your family and friends with your pasta-making skills.
Cooking Orecchiette to Perfection
Cooking orecchiette is as important as making it.
The key is to use plenty of salted boiling water. This ensures that the pasta doesn’t stick together and cooks evenly.
Fresh orecchiette usually takes between 9-12 minutes to cook. You’ll know it’s done when it rises to the surface of the water.
Remember, you want your orecchiette to be al dente. This means it should be cooked so as to be still firm when bitten.
So, keep an eye on your pasta as it cooks. And don’t forget to taste it to ensure it’s cooked to your liking.
Orecchiette Alla Barese: A Classic Dish
Orecchiette alla Barese is a classic dish from the Puglia region.
It’s a simple yet flavorful dish that pairs orecchiette with broccoli rabe and sausage. The bitterness of the broccoli rabe perfectly balances the richness of the sausage.
Here’s a basic recipe for Orecchiette alla Barese:
- Cook your homemade orecchiette in salted boiling water until al dente.
- In a separate pan, brown some Italian sausage.
- Add garlic and chili flakes to the pan and sauté until fragrant.
- Add chopped broccoli rabe to the pan and cook until tender.
- Drain the orecchiette, reserving some pasta water.
- Add the orecchiette to the pan with the sausage and broccoli rabe.
- Toss everything together, adding pasta water as needed to create a sauce.
- Serve with a generous grating of Pecorino cheese.
This dish is a perfect example of how simple ingredients can create a symphony of flavors.
Remember, the quality of your ingredients will greatly affect the final result. So, use the best sausage and freshest broccoli rabe you can find.
Gluten-Free Orecchiette: Alternative Recipe
For those with dietary restrictions, making gluten-free orecchiette is a great option.
The process is similar to the traditional recipe, but you’ll need to substitute semolina with a gluten-free flour blend. Here’s a simple recipe to try:
- Combine 2 cups of gluten-free flour blend with 1 cup of water.
- Knead the dough until it’s smooth and elastic.
- Rest the dough for 30 minutes before shaping the orecchiette.
- Cook the pasta in salted boiling water until al dente.
Remember, gluten-free dough can be a bit more delicate than traditional pasta dough.
Handle it with care to prevent it from falling apart.
Also, the cooking time may vary depending on the flour blend used, so keep a close eye on your pasta.
With this recipe, everyone can enjoy a plate of homemade orecchiette, regardless of dietary restrictions.
Storing and Preserving Homemade it
Once you’ve mastered the art of making orecchiette, you might want to make a large batch.
The good news is, homemade this pasta can be stored for future use. Simply spread the shaped pasta on a baking sheet and let it dry overnight. Once completely dry, transfer the pasta to an airtight container and store it in a cool, dry place. It can last up to a month.
For longer storage, you can freeze the pasta. Just make sure to freeze them in a single layer first to prevent sticking together. Once frozen, transfer them into a freezer bag. They can last up to three months in the freezer.
Common Mistakes to Avoid When Making it
Making this pasta at home can be a rewarding experience. However, there are a few common mistakes that can affect the final result.
One common mistake is not kneading the dough enough. The dough should be smooth and elastic, which can only be achieved through sufficient kneading. Another mistake is not letting the dough rest. Resting the dough makes it easier to shape the pasta.
Lastly, avoid overcooking the pasta. Orecchiette should be cooked al dente, meaning it should still have a slight bite to it. Overcooked pasta can become mushy and lose its shape. By avoiding these common mistakes, you can ensure your homemade this pasta turns out perfect every time.
FAQs About Making Orecchiette
When it comes to making orecchiette at home, several questions often arise. Here are some of the most frequently asked questions and their answers.
Can I use all-purpose flour instead of semolina?
While semolina is the traditional choice, you can use all-purpose flour. However, the texture and taste will be slightly different.
How long should I cook fresh orecchiette?
Fresh orecchiette usually takes between 9-12 minutes to cook. Always taste your pasta to ensure it’s cooked to your liking.
Can I freeze homemade orecchiette?
Yes, you can freeze uncooked orecchiette. Spread the pasta out on a baking sheet and freeze until solid. Then, transfer to a freezer bag for storage.
What sauce goes best with orecchiette?
Orecchiette pairs well with hearty sauces that can fit into the pasta’s “cups.” Traditional orecchiette alla barese uses a sauce made with broccoli rabe and sausage.
Remember, the key to perfect orecchiette is practice. Don’t be discouraged if your first few attempts don’t turn out as expected. Keep trying, and soon you’ll be making authentic orecchiette like a pro.
Conclusion and Final Tips
Making authentic orecchiette at home can be a rewarding experience. Not only do you get to enjoy a delicious meal, but you also get to learn about the rich culinary traditions of Italy. Remember, the key to perfect pasta lies in the quality of your ingredients and the care you put into each step of the process.
Whether you’re making orecchiette for a weeknight dinner or a special occasion, these tips and techniques will help you achieve the best results. So, roll up your sleeves, get your hands in some dough, and start making your own delicious orecchiette at home.